Posted on

Mephedrone (4-MMC) and Nasal Health: A Harm Reduction Guide

Mephedrone (4-MMC) is a popular substance in the cathinone class, but users who insufflate (snort) it often report significant nasal pain, irritation, and potential long-term damage. This discomfort is not caused entirely by the mephedrone molecule itself, but by impurities left over from a careless manufacturing process.

This guide explains the likely cause of this issue and outlines methods to potentially reduce the harm associated with insufflating impure mephedrone.

The Problem: Synthesis Byproducts

While grey market cathinones were often quite high purity, bans of 3-MMC and 4-MMC have lead to less sophisticated clandestine production, and while some grey market websites do conduct quality control, street sellers almost never do. Therefore, produced cathinones can vary widely in purity. A common issue is the presence of leftover reactants, primarily unreacted methylamine and hydrochloric acid (HCl*).

Methylamine is a major cause of the distinctive smell of mephedrone, often described as smelling like “cat urine”. Not only is the smell unpleasant, but methylamine and hydrochloric acid attract water, preventing excess hydrochloric acid from evaporating because the molecules don’t want to be separated from water.

Quickly Test for Excess Acidity

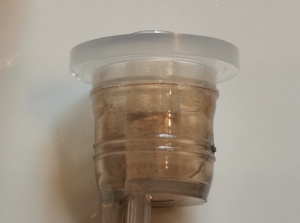
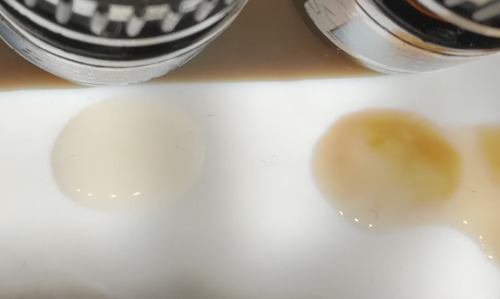
When these impurities are present the crystals often damp and almost oily feeling, with a strong odour. If you have litmus paper, this is obviously the fastest way to test pH. A simple qualitative test can help confirm if your sample has a high acidity with normal baking soda.

  1. Create a concentrated solution of 4-MMC in a small amount of water, about 200mg in 1mL of water is good
  2. Add a tiny pinch of bicarbonate of soda to the solution.
  3. Observe the reaction. If significant and sustained fizzing occurs (the release of carbon dioxide), it suggests the presence of excess acid.
  4. Evaporate the liquid in warm air to get back 4-MMC crystals

Purification Method 1: Simple Heating (Decarboxylation/Drying)

A simple heat-purification technique can help reduce these volatile impurities. This process aims to drive off trapped water, unreacted methylamine, and free hydrochloric acid.

Procedure:

  1. Finely grind your mephedrone powder to maximise surface area.
  2. Spread it in a thin, even layer on a heat-proof dish (e.g., a Pyrex or ceramic plate).
  3. Place the dish in an oven to between 100-120°C (212-248°F) for 2 to 10 hours. The substance should not melt or turn into a goo at this temperature.
  4. Allow it to cool completely before handling.

The result should be a product with a noticeably reduced smell and less corrosive properties.

Purification Method 2: Water Recrystallisation (Advanced)

For those with more chemistry knowledge, recrystallisation is a more effective method for separating mephedrone from water-soluble impurities like methylamine hydrochloride. This process exploits the difference in solubility of mephedrone in hot versus cold water.

Principle: Mephedrone is soluble in hot water but much less soluble in very cold water. Many impurities remain dissolved in the water even when it is cooled.

Simplified Procedure:

  1. Gently heat a minimal amount of distilled water (e.g., ~3mL per 1g of product) to around 80°C.
  2. Dissolve your mephedrone completely in the hot water.
  3. Cover the container and allow it to cool slowly to room temperature, then transfer it to a refrigerator or freezer to cool to around 1°C.
  4. As the solution cools, pure mephedrone crystals will precipitate out of the water. The impurities will largely remain behind in the liquid.
  5. Separate the crystals from the water and allow the crystals to dry thoroughly.
  6. You can also keep the water and dry it out which will give you all the impurities mixed with a little bit of 4-MMC.

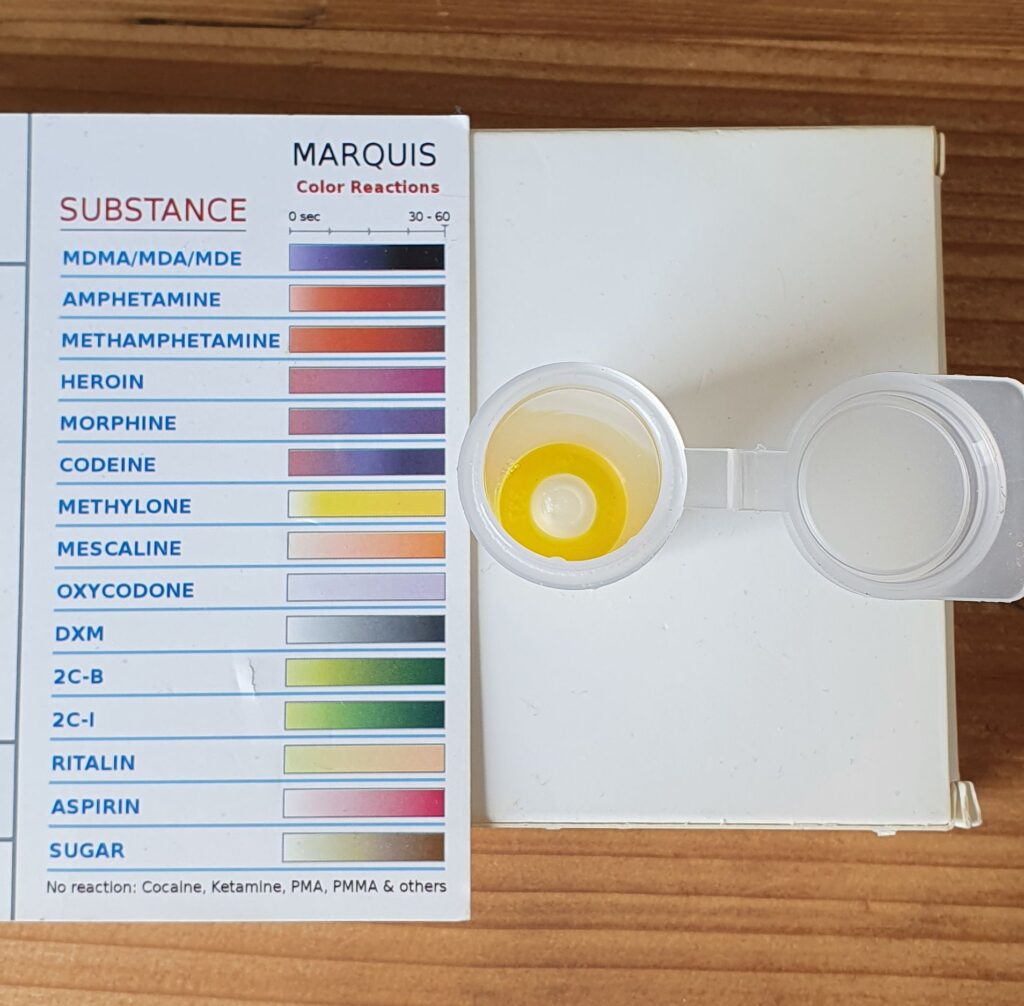
Crucial First Step: Reagent Testing

Before attempting any purification or considering consumption, it is essential to verify the identity of your substance. Reports suggest that a significant percentage of substances sold as mephedrone in Europe are, in fact, different and potentially more dangerous chemicals, such as 4-CMC.

Purification methods will not change an incorrect substance into the desired one. The only way to gain a better understanding of what your sample contains is to use a comprehensive reagent test kit. Always test your substances before you do anything else.

* n.b. HCl is spelled with lowercase L, not HCI as in Hotel Charlie India! It denotes hydrogen chloride, which is a gas at room temperature but LOVES dissolving in water so much that it is normally found in solution, which we call “hydrochloric acid” because the hydrogen ions separate apart from the chloride ions once dissolved.

Posted on

A Critical Look at New Nitazene Test Strip Research: Are They Still a Vital Harm Reduction Tool?


A new study has been published in the Harm Reduction Journal evaluating the effectiveness of nitazene immunoassay test strips. As a provider of drug checking tools, we believe it is vital to engage with new research to ensure our community has the most accurate information available. The paper, “Evaluation of nitazene immunoassay test strips for rapid in-situ detection of nitazene and nitazene analogs in illicit drug samples,” provides some important data, but also contains findings that could be easily misinterpreted without proper context.

This blog post will break down the study’s key findings, address some of its more conclusions, and clarify what this means for people using test strips as a harm reduction tool in the real world.

The Caffeine “False Positive” – A Matter of Interpretation

One of the paper’s headline findings is that the test strips produced false positives when testing seized heroin samples, which they attribute to high concentrations of caffeine, a common cutting agent.

However, a crucial detail is lost in this summary. The researchers themselves note that a “faint line” appeared on these tests. According to the manufacturer’s instructions—and a fundamental rule of interpreting these strips—any line or mark in the test region (T), no matter how faint, must be considered a negative result.

Therefore, calling a faint line a “false positive” is a significant misinterpretation. It is more accurately described as interference that causes the negative-result line to fade. This is an important distinction because it can cause confusion and lead people to discard a substance unnecessarily. While a false positive is far less dangerous than a false negative, correct interpretation is key to building trust in these tools.

While the paper tested strips from the manufacturer BTNX (which Reagent Tests UK does not sell), our own in-house tests on the strips we provide show a similar fading effect from caffeine, but only at very high concentrations, typically above 1mg/mL (1000µg/mL). The researchers found that a true false positive—the complete disappearance of the test line—only occurred with extreme concentrations between 7-10mg/mL.

Do Faint Lines Matter? A Look at Real-World Concentrations

This brings us to the most relevant question: could a high concentration of caffeine mask a dangerous amount of nitazene? Let’s look at the numbers.

If we take the worst-case scenario from the paper, where a true false positive is caused by caffeine at 7mg/mL (7000µg/mL), the test strip is still incredibly sensitive. A strip with a Limit of Detection (LOD) of 3000ng/mL (3µg/mL) could still detect a nitazene analog present at just 0.04% of the total sample weight (3µg nitazene / 7000µg caffeine).

To put that in perspective, the potent nitazene analog etonitazene is roughly 1,500 times the strength of morphine, or about 100 times the strength of heroin. A heroin-equivalent dose of etonitazene would require it to be present at over 0.10% of the total mass. Therefore, a test that can detect nitazenes down to 0.04% is more than capable of identifying a dangerously adulterated sample, even in the event of it being cut with extreme amounts of caffeine.

Using 1mg/mL as a standard testing concentration would allow detection of 0.28% nitazenes in dry mass even for those which are hardest to detect, and 0.05% for easier to detect compounds like N-desethyl etonitazane.

The Real Concern: Undetected “Desnitazenes”

While the caffeine issue has been overstated, the paper raises a far more critical point: the tested strips were unable to detect ‘desnitazene’ analogs. These are compounds like metodesnitazene or etodesnitazene, which lack the “nitro” group from their chemical structure.

The study found that the BTNX strips failed to produce a positive result for these compounds, even at high concentrations. This represents a genuine risk of a false negative. With etodesnitazene possessing a potency of around 70 times that of morphine, its undetected presence in a substance believed to be heroin could easily lead to an overdose.

This is the most significant takeaway for the harm reduction community. We must be vigilant for the appearance of these desnitazene analogs on the market and recognise the current limitations of immunoassay strips in detecting them.

The Golden Rules of Harm Reduction Testing

This research underscores a core principle of drug checking: it can never be used as a guarantee of safety. Instead, testing is a powerful tool to prevent the most dangerous situations from arising, such as encountering a potent synthetic opioid when expecting traditional heroin.

It is just one tool in a much larger harm reduction toolbox. Its use must always be accompanied by other essential practices:

  • Start with a small test dose (“start low, go slow”).
  • Never use alone.
  • Have naloxone on hand and know how to use it.
  • Be aware of the limitations of your testing equipment.

Correct test procedure is also non-negotiable. For nitazene strips, this means:

  1. Dissolve a very small amount of your sample (a tenth of a dose is a good guide) in about 10mL of water.
    • Using warm water and a little lemon juice can help ensure everything dissolves.
  2. Dip the strip into the liquid up to the MAX line for 15 seconds.
  3. Place the strip on a flat, dry surface and wait 5 minutes.
  4. Crucially: two lines, even if one is faint, is a negative result. One line is a positive result. No control line means the test is invalid.
  5. If you get an unclear result, add 10x more water to the sample and test again.

If you get an unclear or positive result:

  1. Take a photo of the test strip, the liquid tested and the sample
  2. Contact Reagent Tests UK (testresultquestions@[ this web URL from this page].uk)
  3. Dilute the liquid so you have 1mL of water for every 1mg of substance you added previously
  4. Repeat the test procedure and record the results.
  5. If you still get a positive result it is likely that you actually have nitazenes in the sample. Please contact us to arrange further testing and get a gift card.

Conclusion: A Valuable Tool, If Used Correctly

The recent study provides valuable data for the harm reduction community. However, it is essential that its findings are interpreted correctly. The risk of false positives from caffeine is low if users are properly informed that a faint line is a negative result.

The far greater risk is the inability of current strips to detect ‘desnitazene’ analogs. This highlights the need for ongoing research and continuing to combine different harm reduction tools to ensure all risks are mitigated.

Ultimately, nitazene test strips remain a vital and valuable harm reduction intervention. They empower people to make more informed decisions about their substance use. It is critical that researchers, healthcare providers, and community members all understand how to use and interpret these tests correctly, acknowledging their strengths and their limitations. By doing so, we can maximise their life-saving potential.

Posted on

Are xylazine test strips are a waste of money for drug checking?

Xylazine is a “non-opioid tranquilizer” which works by relaxing muscles directly, with less emphasis on psychoactive effects than commonly used recreational drugs. In the UK it has been very rarely found in other drugs, creating unexpected sleepiness and difficulty moving around without the same desirable effects that people consume drugs like heroin for.

When injected, xylazine lingers in the tissue where it shrinks blood vessels and reduces blood flow. This can lead to reduced wound healing and reduced ability to fight infection, leading to open wounds around injection sites.

It’s easy to test for the presence of xylazine with reagents. You can read how to test for xyalzine here.

Xylazine takes the form of white powder or small clear crystals, so can be easily mixed into other things to make distinguishing them by eye difficult or impossible.

Why we don’t stock xylazine test strips:

We don’t stock the xylazine strips because we don’t think they offer good value to customers.

  1. Xylazine is extremely rare in the UK
  2. At a cost of around £1 per sample, they only test for xylazine and not any other risks.
  3. They are prone to false positives, meaning that 2-3 need to be used (diluting the sample each time), costing £2-3/sample
  4. Xylazine is not super-potent like fentanyl, so it needs to be present in concentrations well over 10% to be worrying. This means it can be detected easily with reagents, which will detect a huge range of other risks.
  5. Strips do not give any information about the concentration of xylazine present, meaning pharmacologically inactive 1% contamination gives the same result as 50% contamination
  6. Even when present in high concentrations, the risks associated with IV use of xylazine can be managed by changing to smoking

This means that xylazine is not a threat because it is not dangerous enough, not common enough and not present in high enough concentrations on the rare occasions when it is found. The cost of detecting with a single-purpose test is not justified unless there is a specific concern about xylazine in a particular sample, in which case it is better to send it to a lab service to get information about xylazine concentration as well as presence.

Posted on

How to test for xylazine mixed with ketamine

Xylazine is a “non-opioid tranquilizer” which works by relaxing muscles directly, with less emphasis on psychoactive effects than commonly used recreational drugs. In the UK it has been found mixed into ketamine, creating unexpected difficulty moving around without the same desirable effects that people consume ketamine for.

Both substances take the form of white powder or small clear crystals, so distinguishing them by eye is difficult or impossible.

As xylazine is in a different class of substances and has a very different chemical structure, we have a great opportunity to distinguish them with chemical tests. Reagent tests are simple tests that can be used by anyone to identify chemicals and cutting agents.

Test results

Marquis reagent test result
KetamineNo colour change
XylazinePink, changing to red over time
Ketamine mixed with xylazinePink, changing to red over time

As you can see, the test clearly distinguishes the two substances. If both substances are mixed together then we will see the pink/red and the colourless reaction mixed together, so the result will simply be lighter, similar to mixing paint.

Once the presence of xylazine has been ruled out, we can confirm the presence of ketamine using the liebermann reagent or the morris reagent. These have the advantage of giving information about other possible components.

Liebermann reagent resultMorris reagent result
KetamineFaint yellow
(other compounds give a wide range of colours)
Purple
(all other compounds go blue or green)

You can buy ketamine testing kits:

The simplest way to test ketamine is using our ketamine testing reagents.

Why we don’t stock xylazine test strips:

We don’t stock the xylazine strips because we don’t think they offer good value to customers.

  1. At a cost of around £1 per sample, they only test for xylazine and not any other risks.
  2. They are prone to false positives, meaning that 2-3 need to be used (diluting the sample each time), costing £2-3/sample
  3. Xylazine is not super-potent like fentanyl, so it needs to be present in concentrations well over 10% to be worrying. This means it can be detected easily with reagents, which will detect a huge range of other risks.
  4. Even when present in high concentrations, xylazine does not present the same risk as fentanyl
  5. Xylazine is not widespread in the UK
  6. Strips do not give any information about the concentration of xylazine present, meaning pharmacologically inactive 1% contamination gives the same result as 50% contamination

This means that xylazine is not a threat because it is not dangerous enough, not common enough and not present in high enough concentrations on the rare occasions when it is found. The cost of detecting with a single-purpose test is not justified unless many other tests are being done.

Posted on

Your MDMA does not contain methylone, even if your test says it does. Here’s how we know.

Some suppliers of reagent tests provide reaction charts which show methylone as a possiblity. Often, it is the only yellow option on the chart for the marquis reagent. If the only reagent used is the marquis reagent then it’s reasonable that a person would assume they have methylone. This is a dangerous assumption because in 2021, it’s not methylone. You can get the kit to prove this here, but read below to understand exactly why it’s so unlikely.

It is very unlikely because methylone:

  • is banned at UN level (so no legal lab would produce it, same penalties as MDMA for illegal labs),
  • is not easier to make than MDMA,
  • demands lower prices in bulk,
  • sells for higher prices to the niche enthusiasts, it is quite sought after. So if you are a small lab producing small amounts you could get more money by selling it as methylone,
  • is less potent than MDMA so you need to smuggle larger volumes of drug,
  • has not really been seen on the market since 2016, it’s very rare.

If it was methylone (very unlikely) then methylone is very similar risk to MDMA but with less lovey effects and much shorter duration. The whole reason we take issue with this misleading reaction chart is because people might take this substance thinking it’s methylone and that they are happy with the risks being similar to that of MDMA itself.

So what are these substances if methylone is so unlikely, and how can we be sure?

N-ethylpentylone and eutylone are more common now and much more likely to be the culprits here because:

  • They’re quite potent, so easier to smuggle and cheaper to make
  • They’re not scheduled globally, so grey-market labs in asia can produce legally at huge scale (N-ethylpentylone was scheduled in 2020, so this only applies to eutylone now)
  • They also have very similar appearance to MDMA in crystal form (many drugs do, to be fair)
  • They are very commonly seen on the market since around 2018 when more desirable drugs were banned
  • They have the same yellow reaction with the marquis reagent (but can be very easily distinguished with the froehde reagent. This is one great reason why it’s always essential to test with more than one reagent)

We wrote an article on detecting N-ethylpentylone in 2018 because it was so common and causing so many problems. https://www.reagent-tests.uk/blog/how-to-detect-pentylone-and-n-ethylpentylone-sold-as-mdma/

The problem with these nasty compounds is that they lull people into a false sense of security because they feels kind of adequate enough at first, enough to make someone think they just have “rubbish MDMA”. The good effects last about 2 hours, so people take more.

But each redose adds about 6 hours onto the time a person can’t sleep for, so party for 10 hours and then can’t sleep for 30 hours after that. The mixture of residual dopamine release and insomnia then has the ability to cause intense paranoia and anxiety and in vulnerable people (about 1 in 20 cases, particularly at festivals where people dose 2 nights in a row) that develops into temporary psychosis which doesn’t subside until the person can sleep. This often requires medical intervention.

So what’s the solution to this? Always test with more than one reagent. It massively increases confidence in the accuracy of the result and completely avoids this confusing situation.

Posted on

How to extract and test a gelatine LSD tab (geltabs) with reagents

Introduction

LSD is a highly potent psychedelic drug, with a teaspoon of crystals (3g) providing enough for 30,000 doses. It’s normal for the potency of different drugs to be different and there are many pharmaceuticals with this kind of potency. What’s difficult is that home equipment cannot easily measure out the 100 micrograms required for a dose.

To address this, LSD is distributed in pre-measured form. Dissolved in liquid (1 dose per drop) or soaked into blotter paper (1 dose per 5mm square). Less common is to stir the LSD into gelatin, then pour it out to set. The gelatin can be broken off in squares which represent one dose.

The problem is, gelatine can react directly with reagent test to give confusing results. This means we have to separate the LSD from the gelatine. Luckily, this process is very easy, simply requiring chlorine-free water to extract the LSD.

Boiling water sterilises it and removes any chlorine that could damage the LSD, and gelatine doesn’t dissolve well into it.

Equipment

You will need:

  • Recently boiled water that has cooled below 80*C
  • Something to manipulate the water like a syringe, pipette or even a teaspoon
  • A geltab
  • A small container to dissolve the geltab in, such as a shot glass
  • Absorbent paper, cut into a 1cm x 1cm square

Procedure

  1. Boil the water and start cooling
  2. Dip the container into the water to pre-heat it, then take it out
  3. Put the geltab into the container
  4. Add half a teaspoon of the water (1 mL).
  5. The mixture must be at least 40*C for at least 5 minutes.
  6. Cover the container
  7. Allow to soak for 24 hours
  8. Place the paper square on the side of the container, half in the water and half out.
  9. Leave the container un-covered to evaporate. The water will migrate into the paper, carrying the active chemicals with it.
  10. You can now treat the paper like a normal piece of blotter, so cut off a quarter and place the test granules on top.
Posted on

Fluorination treatment for extension of reagent test shelf life

Reagent Tests UK has always been committed to making products that people love to use. From the very start, the goal was to run the type of company that people love to do business with, due to the buying experience but also the quality of the products.

While colorimetric laboratory tests have existed for over 100 years, the practise of reagent testing drugs is relatively new and until 2010 there were very few suppliers. Accordingly, there is a relatively small population of knowledgeable people who know about the tests and there are still many improvements to be made in terms of the consumer products.

Given that reagent tests need to undergo a chemical reaction in 1-3 minutes, it’s not surprising that they are highly reactive chemicals. While this makes them very convenient and fast to use, it also means they can react with things that we would prefer them not to. We have used glass bottles for our products since the beginning because even unreactive polyethylene plastic accelerates the degradation of reagents, through slight permeability as well as direct reaction with the reagents themselves.

The plastic at the bottom of this dropper has permanently discoloured due to reaction with the reagent.

However, glass is a hard material to shape and as a result we have always used plastic dropper tips, meaning that a small amount of plastic does still come into contact with the product. This is minimised by storing upright, but still has an effect.

As we’ve grown we’ve looked for ways to improve our products and in late 2018 we had the idea to try making the plastic droppers more chemical resistant using fluorine treatment. We were delighted to find that the treatment increased the shelf life of reagents by 20-40% without any other impact on performance, and started selling reagents in fluorinated bottles in 2019.

The marquis reagent stored for 5 months at room temperature.
The bottle on the left was fluorine treated and has discoloured much less.

Why make this public?

Of course, it’s difficult to claim that your products have a markedly longer shelf life without telling anyone why. We are really proud of our products and naturally we want to be able to show off their quality, so the time has come to reveal another reason why our customers can be happy they chose to buy from us.

Even when we’re not shouting about it, our products are being developed and improved, and this is one of the things that makes it so easy to be proud of our products and easy for our customers to know that they are getting the best value.

As of August, we’re pushing ahead with our next innovation and we know that we only serve some of the thousands who use colorimetric tests worldwide. We believe that a rising tide lifts all boats, and if every testing product is better then testing will slowly start to spread beyond the knowledgeable core of users that currently exist. This in turn will help Reagent Tests UK even if not everyone buys from us and importantly it helps all the people who rely on the results of the fantastic technology that is reagent testing.

Maybe this doesn’t revolutionise the whole scene but short shelf lives are definitely disappointing to customers so we urge our kindred spirits running other companies to investigate fluorinating their bottles, particularly where they are using plastic bottles and droppers.

Technical Notes

We opted for the maximum level of fluorination available. The lowest level did not produce good improvements in shelf life.

Interestingly, the actual plastic itself had an uneven pattern with the mecke reagent (which shows the worst discolouration of all reagents) and although the shelf life was massively improved, the plastic itself seemed almost worse.

The fluorinated dropper is shown on the right in this photo. The plastic displays an uneven pattern after exposure to the mecke reagent.

Written by Guy Jones, MChem